


You can move a 7 Days to Die game from your own PC, or from a friend who hosted it, onto your DoomHosting server and keep playing where you left off. The short version: stop the server, upload the save folder (and, for a random-generated map, the world folder too), point GameWorld and GameName at them, and start the server again.
Before you start
You need two things from the PC that ran the game:
- The save folder. 7 Days to Die stores every game under
%AppData%\7DaysToDie\Saves\<WorldName>\<GameName>. Paste%AppData%\7DaysToDieinto the Windows Explorer address bar to jump there. The folder one level down is the world name, the folder inside it is your save name. Everything inside the save folder comes along: the map changes, your bases, land claims and player progress. - The generated world, if you played on a random map. Navezgane and the Pregen maps ship with the game, so the server already has them. A random world (RWG) only exists on the PC that generated it, in
%AppData%\7DaysToDie\GeneratedWorlds\<WorldName>. Skip this folder and the save cannot load.
Not sure which one you have? If the world folder under Saves is called Navezgane or starts with Pregen, you only need the save. Any other name (something like South Jalido Mountains) is a random world and you need both.
Make sure the server runs the same game version as the save. A save from a newer or experimental build will not load on an older server. Our guide on updating your 7 Days to Die server shows how to switch branches.
Step 1: Stop the server
Open your server in the game panel and press Stop. The server keeps its world in memory and writes it to disk on shutdown and on autosave, so uploading into a running server gets your files overwritten.
Step 2: Upload the world (random maps only)
On the server, everything lives under .local/share/7DaysToDie. Open the Files tab and go to .local/share/7DaysToDie. You will see GeneratedWorlds next to Saves. If GeneratedWorlds is missing, create it with New folder.
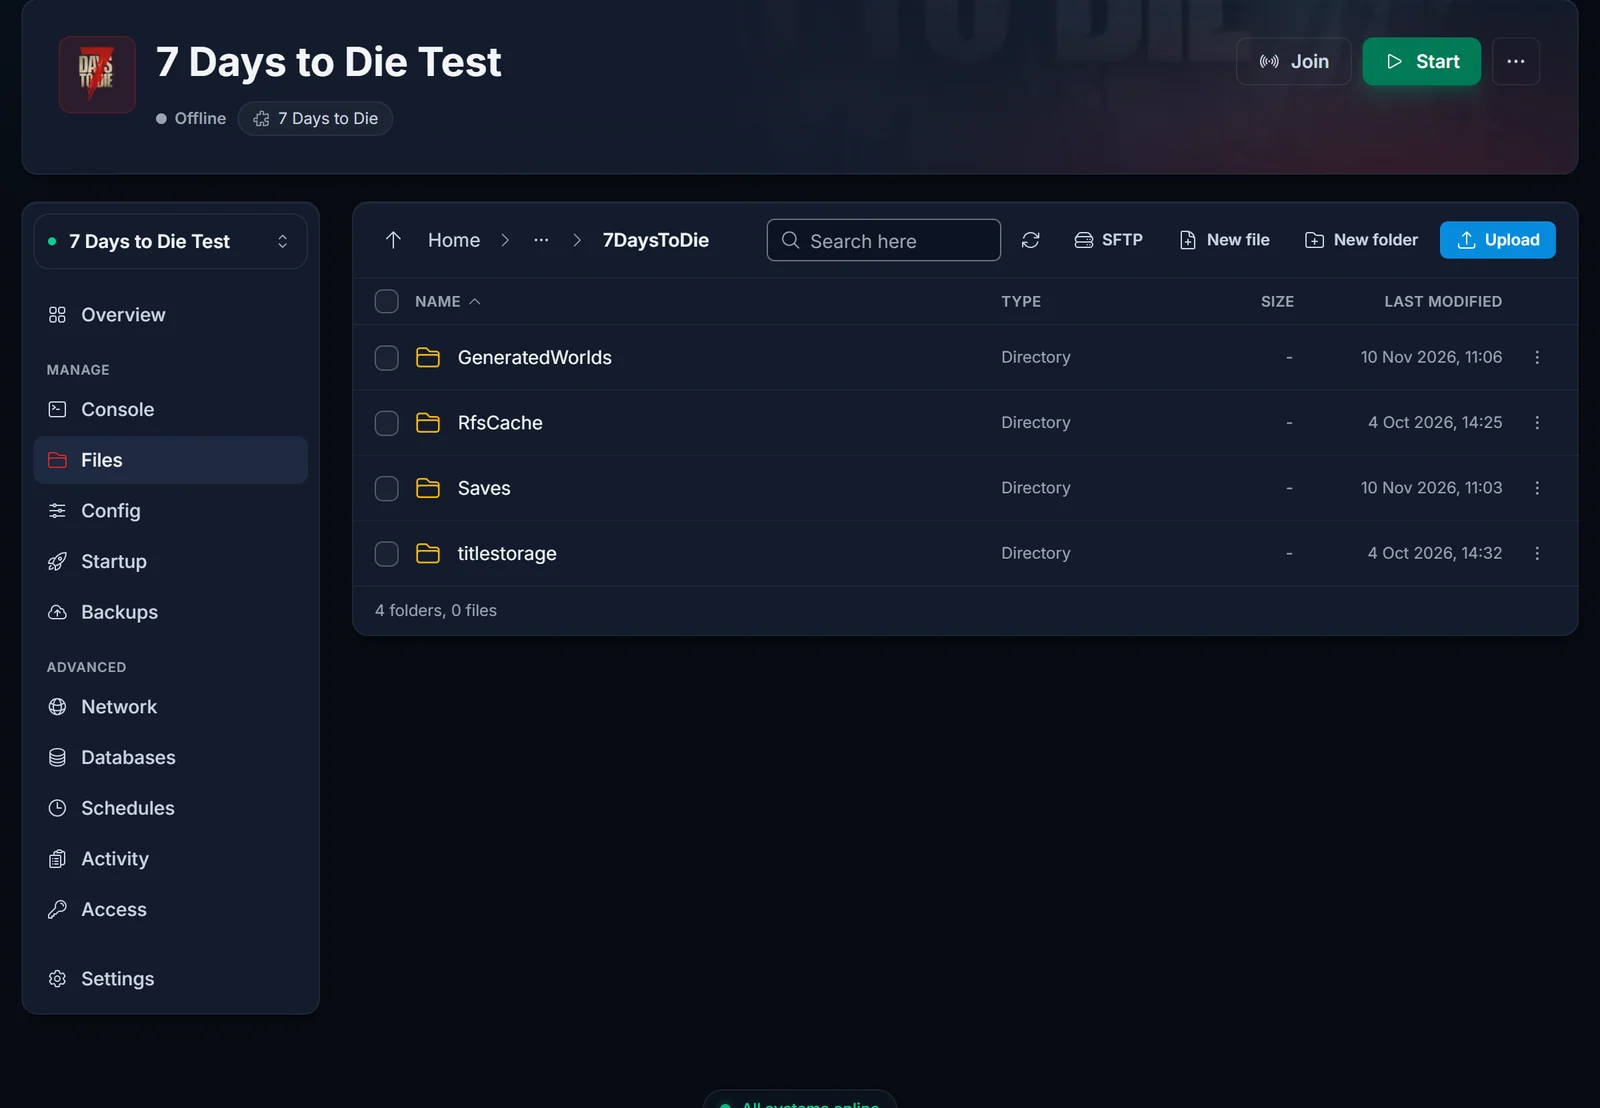
Open GeneratedWorlds and upload your world folder with Upload > Upload folder, so you end up with .local/share/7DaysToDie/GeneratedWorlds/<WorldName>/ holding files like dtm.raw, main.ttw and map_info.xml.
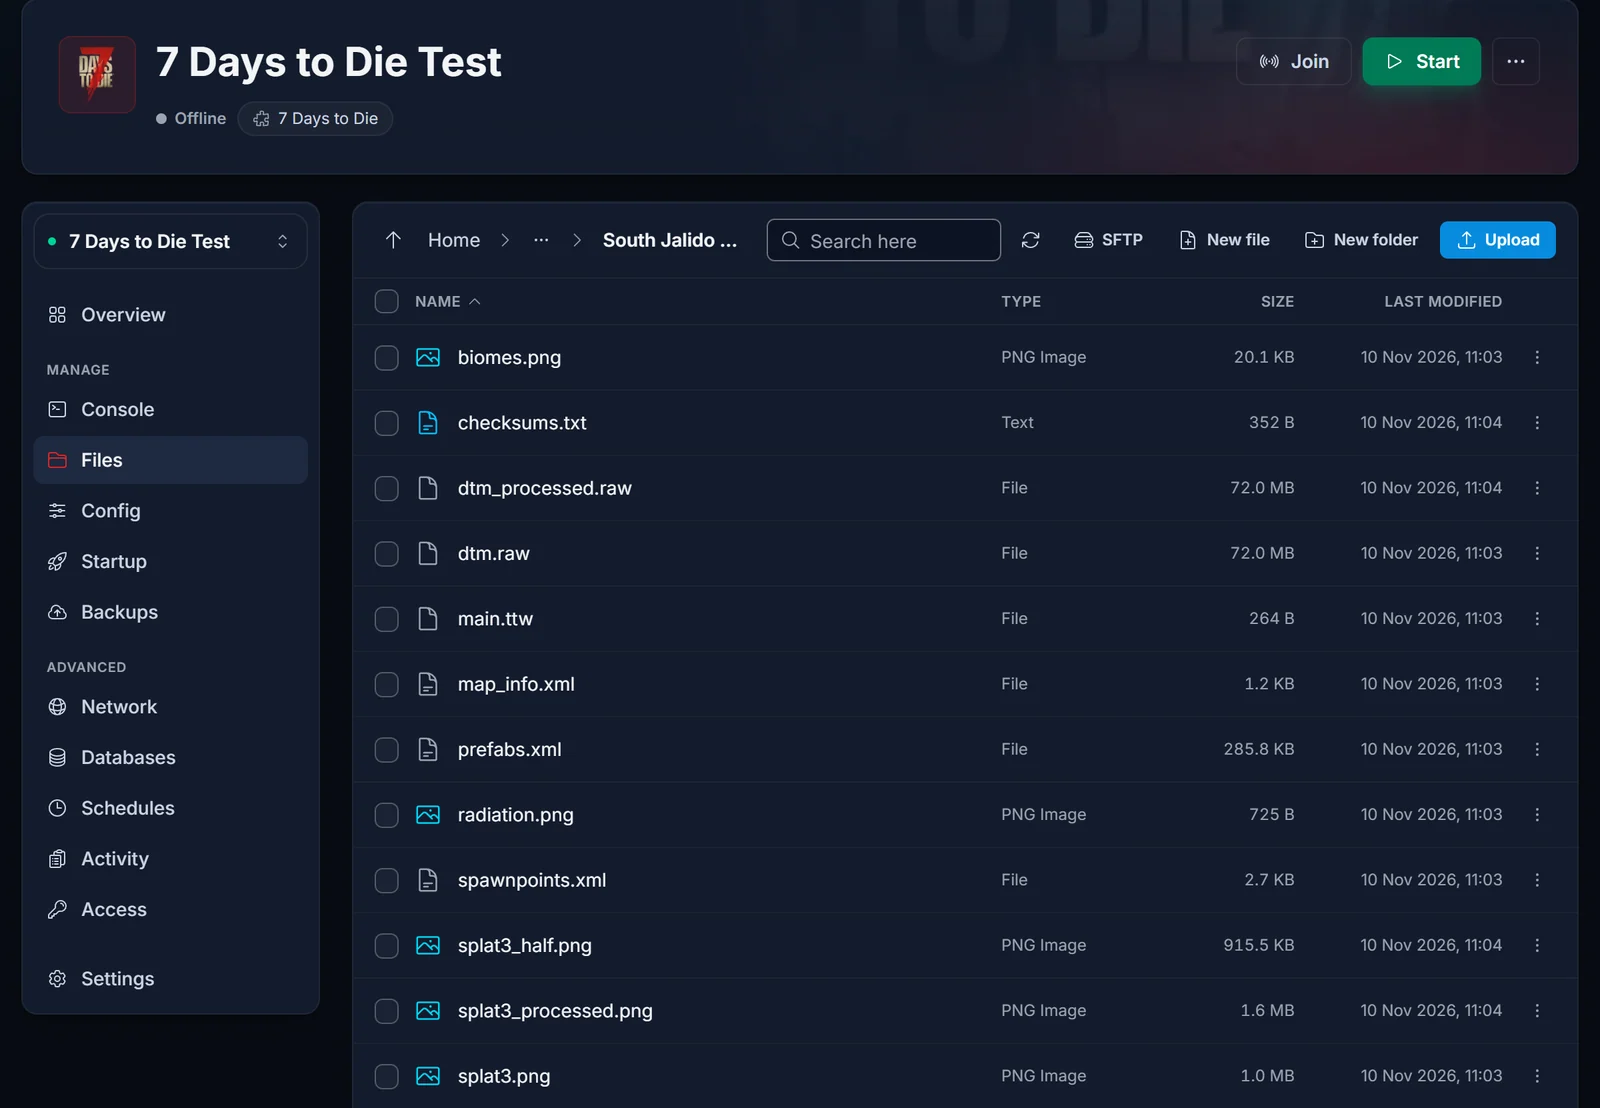
The browser upload takes files up to about 100 MB each. The world's height map (dtm.raw) passes that limit on 8K and 10K maps, so for big worlds use SFTP instead. Our SFTP guide for FileZilla and WinSCP shows how to connect, and SFTP is also the faster choice for any save over a few hundred MB.
Step 3: Upload the save
Go to .local/share/7DaysToDie/Saves. Create a folder with exactly the same world name as on your PC (skip this if it already exists), open it, and upload your save folder into it. The result should be .local/share/7DaysToDie/Saves/<WorldName>/<GameName>/, with main.ttw and the Region folder directly inside (plus a Player folder once anyone has played on it).
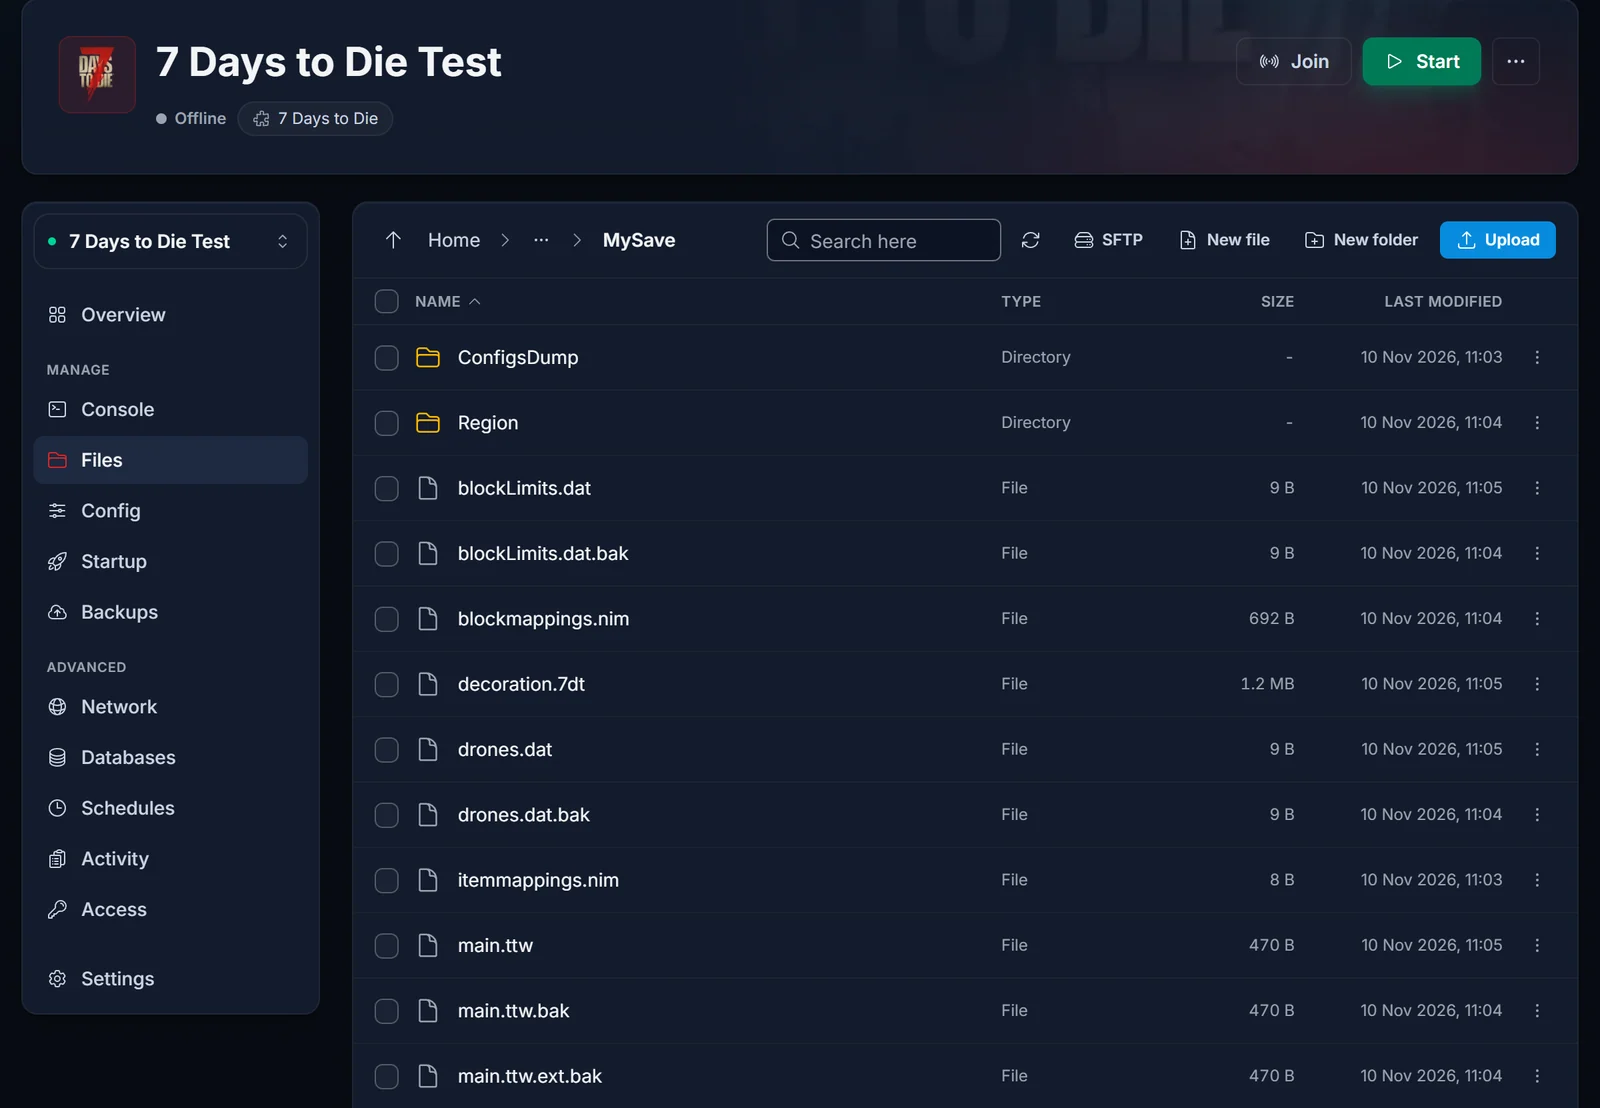
Watch the nesting. A save uploaded one level too deep (Saves/<WorldName>/<GameName>/<GameName>/) or straight into Saves is not found, and the server quietly starts a fresh game instead.
Step 4: Point the server at your save
Two settings in serverconfig.xml decide what the server loads:
GameWorld= the world folder name, for exampleSouth Jalido Mountains,NavezganeorPregen06k01.GameName= the save folder name.
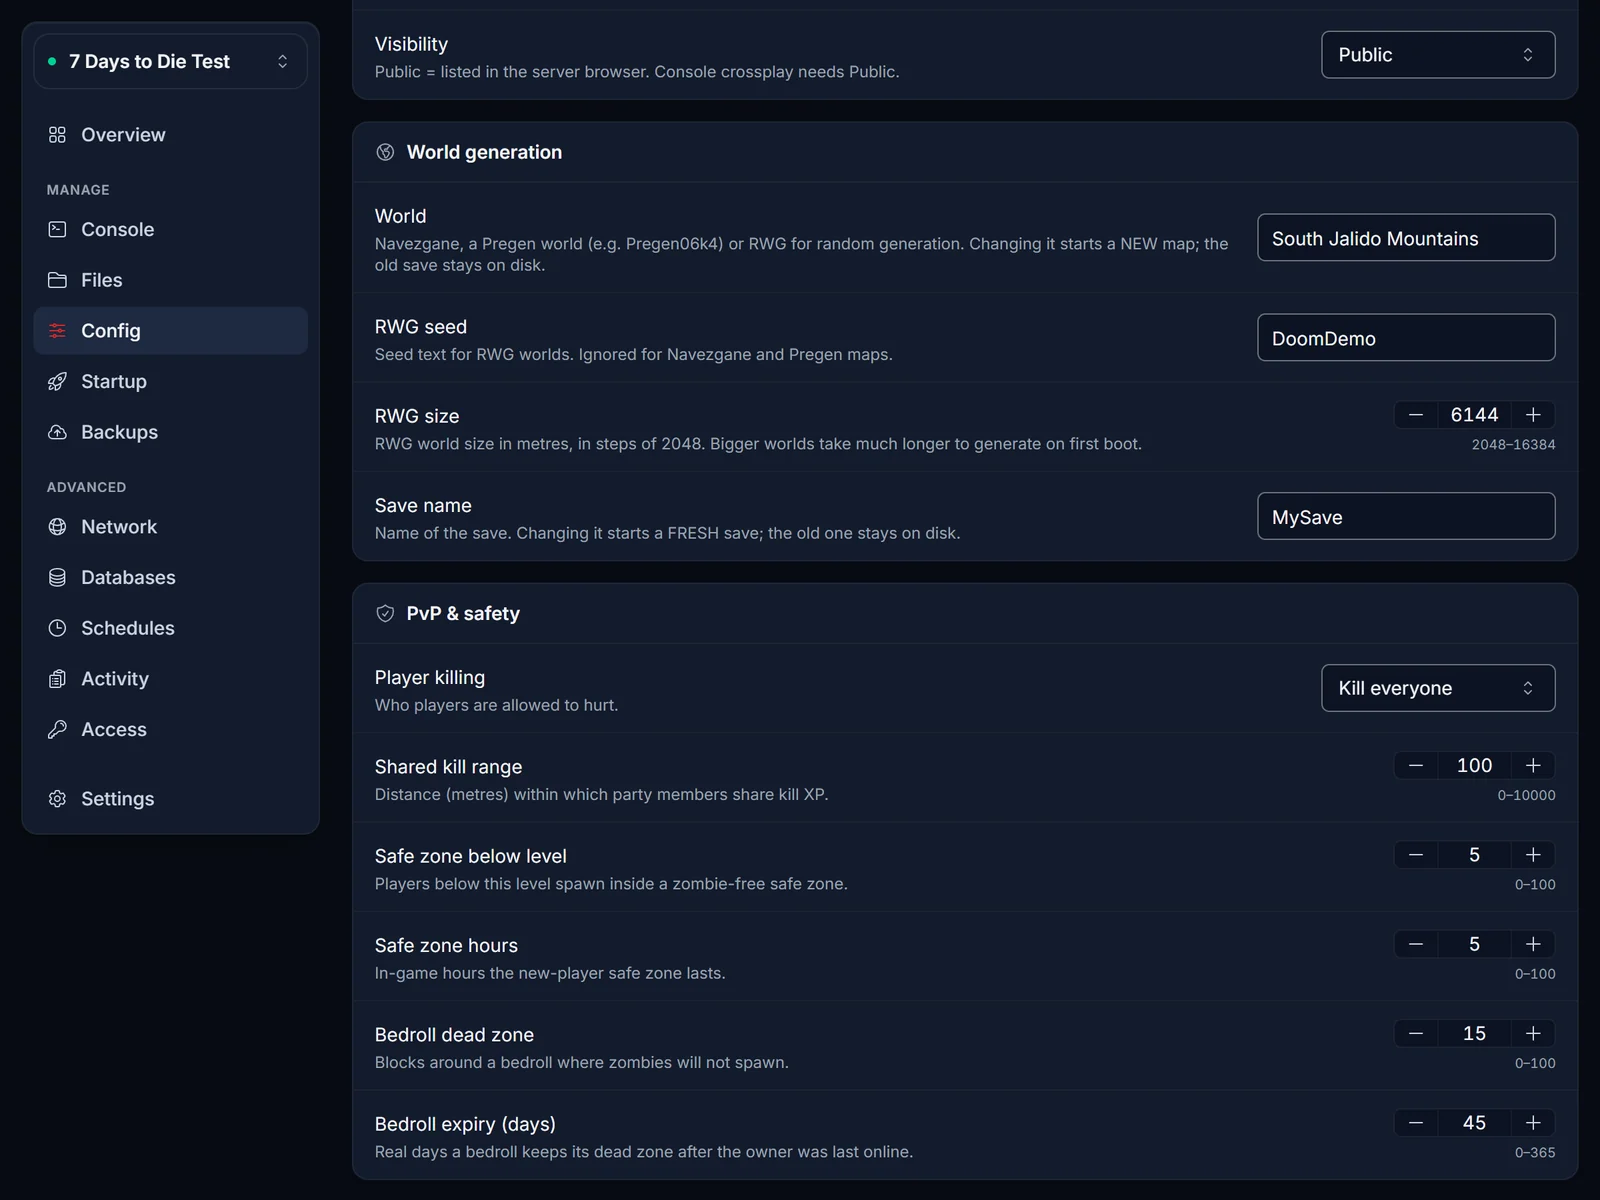
In the panel, open the Config tab and fill in World and Save name under World generation, then save. You can also edit serverconfig.xml in the root of the Files tab:
<property name="GameWorld" value="South Jalido Mountains"/>
<property name="GameName" value="MySave"/>
Both values must match the folder names exactly, including capital letters and spaces. Do not put RWG in GameWorld for an uploaded random world: RWG tells the server to generate a new map from the seed, while the world's own name loads the one you uploaded.
Step 5: Start the server and check the console
Press Start and watch the Console tab. A save that loads correctly shows a line like this, with your world and save names and no world generation before it:
createWorld: South Jalido Mountains, South Jalido Mountains (src: UserDataPath, DeviceLocal), MySave, GameModeSurvival
Your players then spawn at their old positions with their inventories. If the server stops right away or you land in a fresh game, go through the issues below.
Common issues
The server loads a fresh Navezgane game, or stops with "GameWorld not found"
Both come from the same mistake: the random world was never uploaded, so GeneratedWorlds on the server is empty. What you see depends on GameWorld:
- If
GameWorldstill saysNavezgane(the default), the server ignores your save and starts a brand new Navezgane game. - If
GameWorldhas your world name, the server stops during boot and the console showsError starting dedicated server: GameWorld "South Jalido Mountains" not found!.
Uploading the save alone is not enough for a random map. Copy the world folder from %AppData%\7DaysToDie\GeneratedWorlds on your PC to .local/share/7DaysToDie/GeneratedWorlds/ on the server, check that its name matches the world folder under Saves and the GameWorld value exactly, and start the server again.
The server starts a new game with the right map
GameName does not match the save folder, or the save sits at the wrong depth. Compare the folder name letter for letter with the Save name field and check that main.ttw sits directly inside Saves/<WorldName>/<GameName>/.
My progress from the last session is missing
The game was still running on the PC when you copied the files, or the server was running while you uploaded. Close the game (or stop the old server) before copying, stop your DoomHosting server before uploading, and upload again.
The upload stops partway
A single file over the browser limit fails on its own. Use SFTP for the big files, then check in the Files tab that the folder sizes match your PC.
The save will not load after a game update
The save comes from a different game version than the server. Put the server on the same branch you played on, or update the game on your PC and let it open the save once before you upload it.
FAQ
Where are 7 Days to Die save files on the server?
In .local/share/7DaysToDie/Saves/<WorldName>/<GameName>/. Random worlds live next to them in .local/share/7DaysToDie/GeneratedWorlds/<WorldName>/.
Do I need to upload the world for Navezgane?
No. Navezgane and the Pregen maps are part of the game files on every server. Upload only the save and set GameWorld to the map name.
Will my players keep their characters?
Yes. Player progress is stored inside the save folder, so everyone who played on the save keeps their character when they join the server with the same account.
Can I download my server save to play offline?
Yes, the same way in reverse. Stop the server, download the save folder (and the world from GeneratedWorlds for a random map) over SFTP, and copy them into the matching folders under %AppData%\7DaysToDie on your PC.
Running a world for a group? Our 7 Days to Die server hosting gives you full file access, SFTP and the Config tab out of the box.
